BNU-FZH

fengzhenhua@outlook.com

在使用ArchLinux过程,有时候为了稳定起见可以安装多个内核,一般我习惯于安装最新的linuxlinux-lts, 这导致系统启动时需要选择内核启动。一般,系统会默认启动最后安装的内核,而多数时候linux-lts只是做为一个备用内核,而设置系统默认记住最后一个启动的内核,这会是一个更好的方案,本文记录配置方法:

修改配置文件

/etc/default/grub
1
2
3
GRUB_DEFAULT=saved      # 默认使用保存的内核条目
GRUB_SAVEDEFAULT=true # 保存最后一个使用的内核条目
GRUB_DISABLE_SUBMENU=y # 可选,禁用 GRUB 子菜单,使选择内核的操作更简单

在文件/etc/default/grub中,这三项都是明确列出的,第一项是第一行,其他两项在文件中都可以找到对应的位置,其实都已经配置好了,只需要取消注释就可以了。

更新引导配置

设置完成后,更新一下引导配置即可:

1
sudo grub-mkconfig -o /boot/grub/grub.cfg

参考文章

更换可选内核

Neovim 将部分功能交给 provider 方式支持,具体技术细节参见:Provider-Neovim docs, 对于python, ruby, node.jsclipboard等配置均比较完美。

问题描述

出现问题的是perl的配置,在我的Thinkpad T490 上发现检查Neovim的健康时无法检测到perl,但是确实已经装上perl了,根据 Provider-Neovim docs 的配置,其他的支持均没有问题,而perl出现警告:

:checkhealth provider-perl
1
2
3
4
5
6
Perl provider (optional) ~
- WARNING "Neovim::Ext" cpan module is not installed
- ADVICE:
- See :help |provider-perl| for more information.
- You may disable this provider (and warning) by adding `let g:loaded_perl_provider = 0` to your init.vim
- WARNING No usable perl executable found

解决方案(2024-10-09 22:33)

反复安装模块Neovim::Ext

1
2
3
sudo cpanm -n Neovim::Ext

Neovim::Ext is up to date. (0.06)

上述命令无论有没有-n选项都会出现这个提示,不加sudo也是这个提示,这误让我认为我已经安装好模块Neovim::Ext !!

卸载模块Neovim::Ext

1
2
3
4
5
6
sudo cpanm -U Neovim::Ext

!Neovim::Ext is not found in the following directories and can't be uninstalled.

/usr/lib/perl5/5.40/site_perl
/usr/share/perl5/site_perl

这条卸载命令让我意识到,我的系统中其实没有正确安装模块Neovim::Ext,同时新版的Neovim对于在.zshrc中设置的路径方式不再依赖!其实它现在可以直接运行sudo的命令了。

重新安装模块Neovim::Ext

1
2
3
4
5
6
sudo cpanm --reinstall Neovim::Ext

--> Working on Neovim::Ext
Fetching https://www.cpan.org/authors/id/J/JA/JACQUESG/Neovim-Ext-0.06.tar.gz ...OK
...
12 distributions installed

运行完这条命令,则模块Neovim::Ext重新安装成功,再启动nvim运行:checkhealth provider.perl 便得到下述内容:

:checkhealth provider-perl
1
2
3
4
5
6
7
8
9
10
11
12
13
14
15
16
17
18
19
20
21
22
23
provider.perl: require("provider.perl.health").check()

Perl provider (optional) ~
- perl executable: /usr/bin/perl
- OK Latest "Neovim::Ext" cpan module is installed: class is experimental at (eval 8) line 2.
field is experimental at (eval 8) line 4.
method is experimental at (eval 8) line 5.
field is experimental at (eval 8) line 6.
method is experimental at (eval 8) line 7.
field is experimental at (eval 8) line 8.
method is experimental at (eval 8) line 9.
field is experimental at (eval 8) line 10.
method is experimental at (eval 8) line 11.
field is experimental at (eval 8) line 12.
method is experimental at (eval 8) line 13.
field is experimental at (eval 8) line 14.
method is experimental at (eval 8) line 15.
class is experimental at (eval 9) line 2.
field is experimental at (eval 9) line 4.
method is experimental at (eval 9) line 5.
field is experimental at (eval 9) line 6.
method is experimental at (eval 9) line 7.
0.06

总结

这个问题困扰了我一整天,因为总觉得这不应该是一个重大问题,但是两台电脑几乎配置一样,但笔记本上总是不能解决。此次计算机事故,应当牢记遇到问题一般重装程序或模块,同时使用默认配置就可以解决问题。但是,此次没有解决问题的主要原因是对cpanm不够熟悉!所以在cpanm --help后,获取其详细使用规则后就解决了问题。

在使用Neovim编辑文件时,为了提高代码的可读性,按照指定字符对齐是十分必要的。于是今天配置了完全使用lua实现的插件: mini.align, 它是mini.nvim插件集中的一个,但是可以作为单独的插件使用,为了保证插件简洁性,单独安装使用。

安装插件

folke/lazy.nvim插件管理器中安装:

~/.config/nvim/lua/lazy-init.lua
1
2
3
4
5
6
7
{
'echasnovski/mini.align',
version = false,
config = function()
require("mini.align").setup({})
end
},

在启用插件时,即可以在~/.config/nvim/init.lua中使用require单独调用,也可以将配置文件象上述方法一样直接使用config选项写在lazy-init.lua中。前者更适合那些需要大量修改为自定义的插件,后者更适合使用默认配置的插件。一般而言,我更建议大家使用官方默认配置,这样在配置新的电脑时可以更快的进入工作,而不用耗费大量时间来配置插件。除了按这里我的配置外,大家也可以根据官方的README.md来配置,如果只是安装成功了,也可以使用命令:help mini.align来查看配置和使用方法。

默认配置(点击查看)
Default config
1
2
3
4
5
6
7
8
9
10
11
12
13
14
15
16
17
18
19
20
21
22
23
24
25
26
27
28
29
30
31
32
33
34
35
36
37
38
39
40
41
42
43
44
45
46
47
48
49
50
-- No need to copy this inside `setup()`. Will be used automatically.
{
-- Module mappings. Use `''` (empty string) to disable one.
mappings = {
start = 'ga',
start_with_preview = 'gA',
},

-- Modifiers changing alignment steps and/or options
modifiers = {
-- Main option modifiers
['s'] = --<function: enter split pattern>,
['j'] = --<function: choose justify side>,
['m'] = --<function: enter merge delimiter>,

-- Modifiers adding pre-steps
['f'] = --<function: filter parts by entering Lua expression>,
['i'] = --<function: ignore some split matches>,
['p'] = --<function: pair parts>,
['t'] = --<function: trim parts>,

-- Delete some last pre-step
['<BS>'] = --<function: delete some last pre-step>,

-- Special configurations for common splits
['='] = --<function: enhanced setup for '='>,
[','] = --<function: enhanced setup for ','>,
[' '] = --<function: enhanced setup for ' '>,
},

-- Default options controlling alignment process
options = {
split_pattern = '',
justify_side = 'left',
merge_delimiter = '',
},

-- Default steps performing alignment (if `nil`, default is used)
steps = {
pre_split = {},
split = nil,
pre_justify = {},
justify = nil,
pre_merge = {},
merge = nil,
},

-- Whether to disable showing non-error feedback
silent = false,
}

使用方法

  • 选中要对齐的文本内容
  • 快速输入gagA
  • 在命令行中就会出现提示信息,按左、中、右,分隔符对应输入就可以了。
  • 也可以使用命令:help mini.align查看具体实例和操作。

使用Neovim近三年了,最初对于lua并不是很熟悉,同时插件管理器也从packerlazy.nvim切换了一次,这两者的配置也不是完全相同,所以适应了一段时间。今天将我自己的主机搬到办公室后决定再次研究一下这个完全配置,完全实现lua配置,进一步提升性能。

关闭启动时的介绍信息

在使用vimscript配置init.vim文件中使用的命令为:

1
set shortmess+=I

切换为lua配置init.lua文件后,使用命令配置选项(Options)为:

1
vim.opt.shortmess:append({ I = true })

Fcitx5的中英文自动切换

参考:Fcitx5-Arch Wiki, 使用vimscript配置为

~/.config/nvim/init.vim
1
2
3
let fcitx5state=system("fcitx5-remote")
autocmd InsertLeave * :silent let fcitx5state=system("fcitx5-remote")[0] | silent !fcitx5-remote -c " Disable the input method when exiting insert mode and save the state
autocmd InsertEnter * :silent if fcitx5state == 2 | call system("fcitx5-remote -o") | endif

但是在Neovim中更推荐强大的插件fcitx.nvim或者参考neovimcraft-Fcitx.nvim

使用fcitx.nvim后,输入法自动切换的问题以纯lua更加高效强大的实现。

Lua 的版本问题

Neovim的插件依赖lua5.1版本,以前没有去关注这个信息,现在予以处理。Archlinux系统中lua4个版本:lua(Lua5.4), lua53(Lua 5.3), lua52(Lua 5.2)和lua51(Lua5.1), 因此直接安装lua51

1
sudo pacman -S lua51

关键配置文件

~/.config/nvim/init.lua
1
2
3
4
5
6
7
8
9
10
11
12
13
14
15
16
17
18
19
20
21
22
23
24
25
26
27
28
29
30
31
require("lazy-init")
-- 基础设置
require('lsp/base')
-- 配置主题
-- require('theme/catppuccin')
require('theme/tokyonight')
-- 状态栏主题
require('theme/lualine')
-- require('theme/evil_lualine')
-- require('theme/bubbles_lualine')
-- require('theme/slanted-gaps_lualine')
-- require('lsp/keybindings')
-- 编程语言配置
require('lsp/python')
require('lsp/mason')
require('lsp/shell')
require('lsp/texlab')
-- Packer 插件管理
require('plg/cmp')
require('plg/vim-latex')
require('plg/vim-template')
require('plg/nvim-comment')
require('plg/nvim-tree')
require('plg/lspkind')
-- require('plg/indent-blankline')
require('plg/hlchunk')
require('plg/rainbow-delimiters')
require('plg/vista')
-- require('plg/telescope')
require('plg/treesitter')
require('plg/gitsigns')
~/.config/nvim/lua/lsp/base.lua
1
2
3
4
5
6
7
8
9
10
11
12
13
14
15
16
17
18
19
20
21
22
23
24
25
26
27
28
29
30
31
32
33
34
35
36
37
38
39
40
41
42
43
44
45
46
47
48
49
50
51
52
53
54
55
56
57
58
59

-- 设置文件编码格式为 utf-8
vim.g.encoding = "utf-8"
-- 设置文件格式转换
vim.o.fileencodings = "utf-8,gbk,big5,cp936,gb18030,euc-jp,euc-kr,latin1,ucs-bom,ucs "
-- 设置终端编码格式为 utf-8, neovim 已经移除,不再开启
-- vim.o.termencoding = "utf-8"
-- 开启语法高亮
vim.o.syntax = "enable"
-- 显示相对行号
vim.o.relativenumber = true
-- 显示行号
vim.o.number = true
-- 高亮所在行
vim.o.cursorline = true
-- 自动换行
vim.o.wrap = true
-- 显示光标位置
vim.o.ruler = true
-- 边输入边搜索
vim.o.incsearch = true
-- 开启搜索匹配高亮
vim.o.hlsearch = true
-- 搜索时自行判断是否需要忽略大小写
vim.o.smartcase = true

-- tab键转换为 4 个空格
vim.o.tabstop = 4
vim.o.softtabstop = 4
vim.o.shiftwidth = 4
-- 新行对齐当前行,tab转换为空格
vim.o.expandtab = true
vim.bo.expandtab = true
vim.o.autoindent = true
vim.bo.autoindent = true
vim.o.smartindent = true

-- << >> 缩进时移动的长度
vim.o.shiftwidth = 4
vim.bo.shiftwidth = 4

-- 使用jk移动光标时,上下方保留8行
vim.o.scrolloff = 8
vim.o.sidescrolloff = 8

-- 设置自动折叠
vim.o.smartindent = true
-- 历史命令最多保存1000条
vim.o.history = 1000
-- 显示空白字符
vim.o.list = true
-- 样式
vim.o.background = "dark"
vim.o.termguicolors = true
vim.opt.termguicolors = true
-- 关闭错误提示,参考:https://neovim.io/doc/user/diagnostic.html
vim.diagnostic.config({ virtual_text = false })
vim.g.loaded_ruby_provider = 0
vim.opt.shortmess:append({ I = true })
~/.config/nvim/lua/lazy-init.lua
1
2
3
4
5
6
7
8
9
10
11
12
13
14
15
16
17
18
19
20
21
22
23
24
25
26
27
28
29
30
31
32
33
34
35
36
37
38
39
40
41
42
43
44
45
46
47
48
49
50
51
52
53
54
55
56
57
58
59
60
61
62
63
64
65
66
67
68
69
70
71
72
73
74
75
76
77
78
79
80
81
82
83
84
85
86
87
88
89
90
91
92
93
94
95
96
97
98
99
100
101
102
103
104
105
106
107
108
109
110
111
112
113
114
115
116
117
118
119
120
121
122
123
124
125
126
127
128
129
130
131
132
133

local lazypath = vim.fn.stdpath("data") .. "/lazy/lazy.nvim"
if not vim.loop.fs_stat(lazypath) then
vim.fn.system({
"git",
"clone",
"--filter=blob:none",
"https://github.com/folke/lazy.nvim.git",
"--branch=stable", -- latest stable release
lazypath,
})
end
vim.opt.rtp:prepend(lazypath)
require("lazy").setup({
git = {
-- defaults for the `Lazy log` command
-- log = { "-10" }, -- show the last 10 commits
log = { "-8" }, -- show commits from the last 3 days
timeout = 120, -- kill processes that take more than 2 minutes
url_format = "https://github.com/%s.git",
-- lazy.nvim requires git >=2.19.0. If you really want to use lazy with an older version,
-- then set the below to false. This should work, but is NOT supported and will
-- increase downloads a lot.
filter = true,
},
"neovim/nvim-lspconfig",
"williamboman/mason.nvim",
"williamboman/mason-lspconfig.nvim",
-- 借用了vim插件,因为二者是兼容的,速度上vim-latex更快
{
"vim-latex/vim-latex",
lazy = false,
},
-- { "jbyuki/nabla.nvim" },
{ "agate/vim-align" },
-- 添加latex插件vimtex
-- {
-- "lervag/vimtex",
-- lazy = false,
-- },
-- { "mhinz/neovim-remote" },
-- 添加neovim主题
{
"folke/tokyonight.nvim",
"catppuccin/nvim",
},
-- 代码高亮
{ "nvim-treesitter/nvim-treesitter", build =":TSUpdate" },
-- 状态栏主题
{
"nvim-lualine/lualine.nvim",
dependencies = { "nvim-tree/nvim-web-devicons", lazy = true },
},
-- -- nvim-cmp
'hrsh7th/cmp-nvim-lsp',
'hrsh7th/cmp-buffer' ,
'hrsh7th/cmp-path' ,
'hrsh7th/cmp-cmdline' ,
'hrsh7th/nvim-cmp',
-- vsnip
'hrsh7th/cmp-vsnip' ,
'hrsh7th/vim-vsnip' ,
'rafamadriz/friendly-snippets' ,
-- lspkind
{ "onsails/lspkind.nvim" },
-- 自动插入模板
{ "aperezdc/vim-template" },
-- 旧式片段插入程序
{ "SirVer/ultisnips" },
{ "honza/vim-snippets" },
{"tpope/vim-speeddating"},
{"tpope/vim-repeat"},
-- 注释插件
{ "terrortylor/nvim-comment" },
{ "nvim-tree/nvim-web-devicons" },
-- 目录树插件
{ "nvim-tree/nvim-tree.lua" },
-- This plugin adds indentation guides to all lines (including empty lines).
-- { "lukas-reineke/indent-blankline.nvim" },
{
"shellRaining/hlchunk.nvim",
event = { "BufReadPre", "BufNewFile" }
},
-- 彩虹括号
{ "hiphish/rainbow-delimiters.nvim" },
-- 用来显示文件结构的插件,对于编写程序查看各定义时很有帮助
{ "liuchengxu/vista.vim" },
-- 模糊查找
{
"nvim-telescope/telescope.nvim", tag = "0.1.4",
-- or , branch = '0.1.x',
dependencies = { "nvim-lua/plenary.nvim" }
},
-- 2023-12-28 02:09 新增加的插件,有待学习应用
-- {
-- "ibhagwan/fzf-lua",
-- -- optional for icon support
-- dependencies = { "nvim-tree/nvim-web-devicons" },
-- config = function()
-- -- calling `setup` is optional for customization
-- require("fzf-lua").setup({})
-- end
-- },
{
"folke/todo-comments.nvim",
dependencies = { "nvim-lua/plenary.nvim" },
opts = {
-- your configuration comes here
-- or leave it empty to use the default settings
-- refer to the configuration section below
}
},
{
"kylechui/nvim-surround",
version = "*", -- Use for stability; omit to use `main` branch for the latest features
event = "VeryLazy",
config = function()
require("nvim-surround").setup({
-- Configuration here, or leave empty to use defaults
})
end
},
{
"lewis6991/gitsigns.nvim",
},
{
"NvChad/nvim-colorizer.lua",
},
{ "micangl/cmp-vimtex" },
{ "SirVer/ultisnips" },
-- fcitx5 自动切换,这也是Archlinux wiki上推荐的方法
{ "h-hg/fcitx.nvim" },
})
~/.config/nvim/lua/plg/vim-latex.lua
1
2
3
4
5
6
7
8
9
10
11
12
13
14
15
16
17
18
19
20
21
22
23
24
25
26
27
28
29
30
31
32
33
34
35
36
37
38
39
40
41
42
43
44
45
46
47
48
49
50
51
52
53
54
55
56
57
58
59
60
61
62
63

#! /usr/bin/env lua
--
-- vim-latex.lua
-- Copyright (C) 2023 feng <feng@arch>
--
-- Distributed under terms of the MIT license.
--
-- vim-latex默认的局势键
-- F1 帮助菜单
-- F5 插入环境选择对话框,若在导言区将弹出插入宏包对话框
-- <S-F5> 修改环境
-- F7 插入引用选择对话框
-- <S-F7> 修改命令
--绑定快捷键
vim.api.nvim_create_autocmd("FileType",{
pattern = "tex",
callback = function()
-- 配置F4打开模板
vim.api.nvim_set_keymap("n", "<F4>", ":TTemplate<CR>", {noremap = true, silent = true})
-- 配置pdflatex编译,原vim-latex中使用\ll 默认 xelatex 编译
vim.api.nvim_set_keymap("n", "<F6>", [[<cmd>!pdflatex % ; bibtex %:t:r.aux ; pdflatex % ; pdflatex % <CR>]], {noremap = true, silent = true})
-- 配置F8编译 aux辅助文件,直接根据数据库生成文献引用, 注意使用%:t:r 截取文件名
vim.api.nvim_set_keymap("n", "<F8>", [[<cmd>!bibtex %:t:r.aux <CR>]], {noremap = true, silent = true})
-- 配置F10编译多合一文件时,以当前目录名为主文件,以节省时间
vim.api.nvim_set_keymap("n", "<F10>", [[<cmd>!xelatex $(echo $PWD|awk -F"/" '{print $NF}').tex <CR>]], {noremap = true, silent = true})
end
})
-- 开启treesitter提供的语法高亮
vim.api.nvim_create_autocmd( 'FileType', { pattern = 'tex',
callback = function(args)
vim.treesitter.start(args.buf, 'latex')
vim.bo[args.buf].syntax = 'on' -- only if additional legacy syntax is needed
end
})
-- neovim将Shift+F5映射为F17,Shift+F7 映射为F19
vim.api.nvim_set_keymap('n', '<F17>' , '<S-F5>', { })
vim.api.nvim_set_keymap('i', '<F17>' , '<S-F5>', { })
vim.api.nvim_set_keymap('n', '<F19>' , '<S-F7>', { })
vim.api.nvim_set_keymap('i', '<F19>' , '<S-F7>', { })
-- set for vim-latex/latex-suit:winaltkeys
vim.g['Tex_Menus'] = 0
vim.g['Tex_Flavor'] = 'latex'
vim.g['Tex_IgnoreLevel'] = 8
vim.g['Tex_GotoError'] = 0
vim.g['Tex_DefaultTargetFormat'] = 'pdf'
-- 配置默认编译引擎为 xelatex
vim.g['Tex_CompileRule_pdf'] = 'xelatex -synctex=1 -interaction=nonstopmode -file-line-error-style $*'
-- 获取桌面环境,并根据桌面环境选择默认的PDF阅读器
if os.getenv("DESKTOP_SESSION") == "plasma" then
vim.g['Tex_ViewRule_pdf'] = 'okular'
else
vim.g['Tex_ViewRule_pdf'] = 'evince'
end
-- 控制统计过程中的警告信息
vim.g['Tex_IgnoredWarnings'] = {}
-- 配置自定义模板路径
vim.g['Tex_CustomTemplateDirectory'] = "~/.latex-templates/"
-- 取消自动缩进
vim.g['tex_indent_items'] = 0
-- 开启Alt键
vim.g['Tex_AdvancedMath'] = 1
vim.api.nvim_set_option('winaltkeys','no')
~/.config/nvim/lua/plg/vista.lua
1
2
3
4
5
6
7
8
9
10
11
12
13
14
#! /usr/bin/env lua
--
-- vista.lua
-- Copyright (C) 2023 feng <feng@archlinux>
--
-- Distributed under terms of the MIT license.
--
--绑定快捷键
vim.api.nvim_set_keymap("n", "<F3>", ":Vista!!<CR>", {noremap = true, silent = true})
vim.g['vista_icon_indent'] = {"╰─▸ ","├─▸ "}
-- vista_default_executive 可选项:ale, cod, ctags, lcn, nvim_lsp, vim_lsc, vim_lsp
vim.api.nvim_set_var('vista_default_executive', 'nvim_lsp')
vim.g['vista_fzf_preview'] = 'right:50%'
vim.api.nvim_set_var('vista#renderer#enable_icon', 1)
~/.config/nvim/lua/plg/vim-template.lua
1
2
3
4
5
6
7
8
9
10
11
12

#! /usr/bin/env lua
--
-- vim-template.lua
-- Copyright (C) 2023 feng <feng@arch>
--
-- Distributed under terms of the MIT license.
-- 设置自定义模板目录
vim.g['templates_directory'] = {'~/.vim_templates'}
vim.g['email'] = 'fengzhenhua@outlook.com'
vim.g['username'] = 'Zhen-hua Feng'
vim.g['license'] = 'MIT'

注意:github上有两个相当类似的插件aperezdc/vim-templatetibabit/vim-templates, 而前者才是我们需要的,记住千万不要下错。同时,在编写脚本时,如果需要输入作者,直接使用变量%USER%而不要使用函数自定义%AUTHOR%,仅仅一个变量,自定义太过麻烦,不提倡。 在配置变量时,可以打开nvim然后在命令行模式输入:help vim-template就可以获得全部可配置变量,在此不再记录。

除了上述列出的几个关键修改为适配lua配置的插件外,还有其他的配置,不再一一列出。如您需要其他配置,请发邮件联系本人索取。

简介

Mathematica是一款由Wolfram Research公司开发的科学计算软件,它将数值和符号计算引擎、图形系统、编程语言、文本系统以及其他应用程序的高级连接完美结合在一起。这款软件自1988年发布以来,已经在科技和其他领域产生了深远的影响,被广泛认为是现代科技计算的开端。

基本功能(点击查看)
  • 数值和符号计算:Mathematica能够进行高效的数值计算和精确的符号计算,如多项式求解、方程求解、极限求解、积分求解等。

  • 图形系统:提供强大的图形绘制功能,可用于创建高质量的二维和三维图形。

  • 编程语言:集成了高级程序设计语言,允许用户编写自定义脚本和函数。

  • 文本系统:支持文本编辑和处理,方便用户记录和分享计算过程。

  • 应用程序连接:能够与其他应用程序建立高级连接,实现数据和功能的集成。 主要应用领域 Mathematica的应用领域非常广泛,包括但不限于:

  • 科学研究:用于解决复杂的科学和工程问题,如物理、化学、生物学等领域的研究。

  • 工程设计:在航空航天、汽车制造等行业中用于模拟和分析。

  • 数据分析:处理和分析大量数据,提取有价值的信息。

  • 教育和学习:作为教学和学习的工具,帮助学生和专业人士掌握数学和编程技能。 在科研和教育中的重要性

  • 科研:Mathematica的强大计算能力和丰富的功能使其成为科研人员解决复杂问题的有力工具,加速了科研进程。

下载安装

  • Mathematica最新版官方下载(推荐): 官网会根据您的操作系统自动选择版,一般而言Windows系统用户使用此软件多一些,选择下载版本将获得Wolfram_14.1.0_WIN_Bndl_DLM_CN.exe, 双击安装,它将自动从官网下载最新的Mathematica 14.1.0, 下载完成后进入到保存目录,双击setup.exe安装即可。

  • 百度网盘+提取码: 网速感人,推荐有百度SVIP的用户下载,这样能快一点。为了确保文件的安全,压缩文件添加了密码,在脚本之家下载的软件一般默认压缩文件的解压密码为.

破解测试

本人坚决支持正版,请大家购买正版软件。但本博客引用网络上的技术,记录一下破解技术以供大家体验测试之用,测试完成后请及时删除并购买正版。

激活步骤:

  1. 启动Mathematica
启动Mathematica
  1. 在开始菜单点击程序,启动Mathematica, 选择"其他激活方式“
其他激活方式
  1. 选择激活的方法
通过激活密钥和请求的密码离线激活
  1. 获取MachineID, 并复制这个MachineID
离线激活获取MachineID
  1. 获取激活密钥和密码

打开下述网站之一:

MachineID粘贴到网站的Math id对话框,然后点击Generate Activation Key And Password!生成密钥, 此时就会生成对应的激活密钥和密码。将Activation KeyPassword分别填入软件的对话框中,点击激活即可完成激活。

参考文章

今天更新我的笔记本电脑发现总是出错,错误信息如下:

sudo pacman -Syu
1
2
3
4
5
6
7
8
9
10
11
12
:: 进行安装吗? [Y/n] y
:: 正在获取软件包......
pandoc-cli-0.1.1.1-141-x86_64.pkg.tar.zst下载失败
全部 (1/8) 171.5 KiB 318 KiB/s 00:01 [#####################################] 100%
错误:无法从 mirrors.tuna.tsinghua.edu.cn : The requested URL returned error: 404 获取文件 'pandoc-cli-0.1.1.1-141-x86_64.pkg.tar.zst'
错误:无法从 mirrors.tuna.tsinghua.edu.cn : Protocol "rsync" not supported 获取文件 'pandoc-cli-0.1.1.1-141-x86_64.pkg.tar.zst'
警告:mirrors.tuna.tsinghua.edu.cn 返回错误过多,将在此事务的剩余部分中跳过
错误:无法从 rsync.mirrors.ustc.edu.cn : Protocol "rsync" not supported 获取文件 'pandoc-cli-0.1.1.1-141-x86_64.pkg.tar.zst'
警告:无法获取某些文件
错误:无法提交处理 (无法获取某些文件)
发生错误,没有软件包被更新。

造成错误的原因是办公室和宿舍同时配置了台式机,所以较长时间没有更新和使用我的Thinkpad T490 了. 解决方法为:重新生成一下源文件,然后再更新。

1
2
sudo reflector --verbose -c China --latest 12 --sort rate --threads 100 --save /etc/pacman.d/mirrorlist
sudo pacman -Syu

作为电子书管理的瑞士军刀,Calibre 一直备受书籍爱好者和数字书虫们的喜爱。虽然存在更好(更轻量级)的 电子书阅读器,但 Calibre 在创建电子书、转换格式以及管理你的电子书库方面做得更出色。简言之,它是满足你所有电子书需求的全套解决方案。

从ArchLinux仓库中安装 Calibre

1
sudo pacman -S calibre

如果您不需要它,可以使用pacman卸载 Calibre

1
sudo pacman -Rns calibre

获取最新版本的 Calibre

Calibre 官方 推荐安装提供的官方二进制文件。目的是防止用户使用存在错误或已过时的软件包。该二进制文件包含了所有私有版本的依赖项,支持 32 位和 64 位的机器。

安装依赖

1
sudo pacman -S xdg-utils wget xz-utils python3

从官网安装二进制文件

1
sudo -v && wget -nv -O- https://download.calibre-ebook.com/linux-installer.sh | sudo sh /dev/stdin
关于上述安装命令的解解释

考虑两种情况:

  1. sudo未配置为命令需要密码( NOPASSWD标记), 对sudo的两个调用都在没有任何提示的情况下成功。
  2. sudo被配置为需要命令的密码:
    • 如果它们最近进行了身份验证,sudo -v只需更新缓存凭据的时间戳即可。
    • 如果用户最近没有对sudo进行身份验证,它将提示他们输入密码;一旦经过验证,他们的凭据就会被缓存。

一旦sudo -v进程成功,第二个sudo sh /dev/stdin调用应该使用其缓存的凭据并不间断地运行。

考虑另一种情况( sudo仍然被配置为提示输入密码),其中没有初始的sudo -v命令。在这种情况下,wget可能已经将输出写到stdoutstderr,这可能会导致用户错过看到它,并想知道为什么什么都没有发生。

sh /dev/stdin的目的是什么?

在这里,sh是用一个参数作为command_file调用的,这个参数是一个特殊的文件--一个指向stdin的链接。

名称破折号-命令解释器(外壳)简要说明破折号.[command_file 争论...]

结果,sh读取command_file,期待并执行它的命令。这个特殊的stdin“文件”通过管道连接到来自wget的输出,因此最终的结果是将URL的内容发送到根级shell

我不知道为什么口径项目具体选择这种语法。备选办法包括:
1
2
... | sudo sh
... | sudo sh -

创建启动器

/usr/share/applications/calibre-gui.desktop
1
2
3
4
5
6
7
8
9
10
11
12
13
[Desktop Entry]
Version=1.0
Type=Application
Name=Calibre
GenericName=E-book library management
Comment=E-book library management: Convert, view, share, catalogue all your e-books
TryExec=/opt/calibre/calibre
Exec=/opt/calibre/calibre --detach %U
Icon=calibre-gui
Categories=Office;
X-GNOME-UsesNotifications=true
Keywords=epub;ebook;manager;
MimeType=application/x-cbz;application/x-cbc;application/x-mobipocket-ebook;application/vnd.openxmlformats-officedocument.wordprocessingml.document;application/ereader;application/x-cb7;application/x-mobi8-ebook;application/vnd.ms-word.document.macroenabled.12;application/vnd.ctc-posml;application/epub+zip;application/oebps-package+xml;image/vnd.djvu;application/x-cbr;application/x-sony-bbeb;application/x-mobipocket-subscription;x-scheme-handler/calibre;
/usr/share/applications/calibre-lrfviewer.desktop
1
2
3
4
5
6
7
8
9
10
11
12
[Desktop Entry]
Version=1.0
Type=Application
Name=LRF viewer
GenericName=Viewer for LRF files
Comment=Viewer for LRF files (SONY ebook format files)
TryExec=/opt/calibre/lrfviewer
Exec=/opt/calibre/lrfviewer %f
Icon=calibre-viewer
MimeType=application/x-sony-bbeb;
Categories=Office;Viewer;
Keywords=lrf;viewer;
/usr/share/applications/calibre-ebook-edit.desktop
1
2
3
4
5
6
7
8
9
10
11
12
[Desktop Entry]
Version=1.0
Type=Application
Name=E-book editor
GenericName=Editor for E-books
Comment=Edit E-books in various formats
TryExec=/opt/calibre/ebook-edit
Exec=/opt/calibre/ebook-edit --detach %f
Icon=calibre-ebook-edit
Categories=Office;WordProcessor
Keywords=epub;ebook;editor;
MimeType=application/xhtml+xml;application/vnd.openxmlformats-officedocument.wordprocessingml.document;application/x-mobi8-ebook;application/epub+zip;text/html;
/usr/share/applications/calibre-ebook-viewer.desktop
1
2
3
4
5
6
7
8
9
10
11
12
[Desktop Entry]
Version=1.0
Type=Application
Name=E-book viewer
GenericName=Viewer for E-books
Comment=Viewer for E-books in all the major formats
TryExec=/opt/calibre/ebook-viewer
Exec=/opt/calibre/ebook-viewer --detach %f
Icon=calibre-viewer
Categories=Office;Viewer;
Keywords=epub;ebook;viewer;
MimeType=application/x-cbz;application/x-cbc;application/x-mobipocket-ebook;application/vnd.openxmlformats-officedocument.wordprocessingml.document;application/ereader;application/x-cb7;application/x-mobi8-ebook;application/vnd.ms-word.document.macroenabled.12;application/vnd.ctc-posml;application/epub+zip;application/oebps-package+xml;image/vnd.djvu;application/x-cbr;application/x-sony-bbeb;application/x-mobipocket-subscription;

注意:各启动器文件所有者和群组都应当设置为root.

参考文章

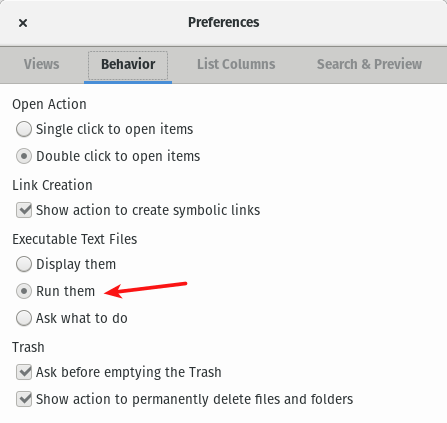
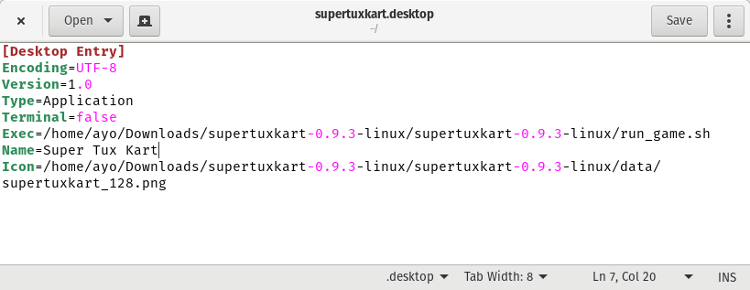
Linux KDELinux GNOME桌面系统都使用 Desktop Entry Specification来描述程序启动配置信息。Desktop Entry 文件标准是由 X Desktop Group 制定的,目前最新的版本是"Desktop Entry Specification 1.5"。

有时候遇到一个较大的PDF文件,但是我们想得到一份压缩版的小文件,本文介绍几种方法。

Linux 中的命令 gostscript

安装gostscript工具

1
sudo pacman -S gostscript

压缩到可读的质量

1
gs -sDEVICE=pdfwrite -dCompatibilityLevel=1.4 -dPDFSETTINGS=/screen -dNOPAUSE -dQUIET -dBATCH -sOutputFile=output.pdf input.pdf
-dPDFSETTINGS Option Description
-dPDFSETTINGS=/screen Has a lower quality and smaller size. (72 dpi)
-dPDFSETTINGS=/ebook Has a better quality, but has a slightly larger size (150 dpi)
-dPDFSETTINGS=/prepress Output is of a higher size and quality (300 dpi)
-dPDFSETTINGS=/printer Output is of a printer type quality (300 dpi)
-dPDFSETTINGS=/default Selects the output which is useful for multiple purposes. Can cause large PDFS.

Linux 使用ps2pdf命令

此命令 ps2pdf 将 PDF 转换为 PS,然后再转换回来,从而有效地压缩它。它可能并不总是有效,但它可以提供非常好的结果。

1
ps2pdf input.pdf output.pdf

建议您使用 -dPDFSETTINGS=/ebooks 设置以获得最佳性能,因为电子书的可读性最好,而且尺寸足够小。

1
ps2pdf -dPDFSETTINGS=/ebook input.pdf output.pdf

在线工具

问题描述

平时的工作中离不开编写脚本,LaTeX等纯文本文件。然而,有时候我们会遇到多个文件中存在某一个字符串,但是时间久了我们记不请哪个文件中有这个字符串. 由于技术的更新我们需要把这个字符串替换为新的字符串, 而一个文件一个文件的去人工查找,然后即使使用vim来替换也是一个相当大的工作量,同时也容易遗漏。

解决方案

本文介绍一条命令即可搞定这个操作:

1
sed -i "s/原字符串/新字符串/g" `grep 原字符串 -rl 所在目录`

命令解释

  • 命令行中的反单引号(和左上角~在同一个键上), 表示执行这条命令,并将其输出作为其他命令的参数。
  • 命令grep 原字符串 -rl 所在目录, 使用grep查找当前目录中含有原字符串的文件,并带有路径表示。
  • sed -i \"s/原字符串/新字符串/g\" 目标文件 表示使用sed将目标文件中的原字符串替换为新字符串

参考命令

设置畅言云评

畅言是业界领先的社交评论系统,同时支持 PC 端和移动端的访问方式,提供了一种全新的网站评论方式。畅言拥有多种常用账号登录、三重过滤机制、实时数据统计、数据快速导出、全面支持移动端等领先功能。完全满足各大网站的用户登录、评论、分享、审核需求。

  1. 创建账号或登录畅言,然后添加站点以获取 APP IDAPP SECRET

  2. enable 设置为 true,并将获取到的 APP ID(appid)APP SECRET(appkey)添加到 NexT 配置文件的畅言部分,如下所示:

    NexT config file
    1
    2
    3
    4
    5
    6
    # changyan
    changyan:
    enable: false
    appid:
    appkey:
    count: true

    注意:评论后,您需要一些时间才能看到评论数量的增加。

Next Comment Systems