01. CupPy 概览 今天我们来聊聊一个在 Python
数据科学领域中日益受到关注的库——CuPy。
什么是 CuPy?
CuPy 是一个开源的 Python 库,它的设计初衷是为了使得在 GPU
上的计算变得简单快捷。
它提供了与 NumPy 非常相似的 API,这意味着如果你已经熟悉
NumPy,那么使用 CuPy 将会非常容易。
CuPy 的亮点在于它能够利用 NVIDIA GPU
来加速计算,这在处理大规模数据时尤其有用。
https://github.com/cupy/cupy
为什么选择 CuPy?
速度提升显著:根据多个来源的数据,CuPy 在某些操作上比 NumPy
快了几十甚至几百倍。这对于数据科学和机器学习等领域的应用来说,意味着更高效的数据处理和分析能力。
易于上手:CuPy 的接口设计遵循 NumPy,这使得那些已经熟悉 NumPy
的用户可以轻松迁移到 CuPy。
广泛的应用场景:从深度学习到图像处理,CuPy 都能提供强大的支持。
安装 CuPy
安装 CuPy 相当简单。你只需要使用 pip 命令:
1 2 3 4 5 6 7 8 9 10 11 pip install cupy-cuda11x pip install cupy-cuda12x pip install cupy-rocm-4 -3 pip install cupy-rocm-5 -
一个简单的例子
让我们来看一个简单的例子,对比一下 NumPy 和 CuPy
在处理同样任务时的速度差异。
1
2
3
4
5
6
7
8
9
10
11
12
13
14
15
import numpy as npimport cupy as cpimport timestart_time = time.time() numpy_array = np.random.rand(10000 , 10000 ) numpy_result = numpy_array ** 2 print ("NumPy 时间:" , time.time() - start_time)start_time = time.time() cupy_array = cp.random.rand(10000 , 10000 ) cupy_result = cupy_array ** 2 print ("CuPy 时间:" , time.time() - start_time)
NumPy 时间:3.474796772003174
CuPy 时间:0.0693259145678
在这个例子中,我们创建了一个大型数组,并计算了它的平方。
我们会发现,使用 CuPy 完成同样的任务所需的时间远少于
NumPy,速度提升了 50 倍。
一个更酷的性能对比
创建一个 3D NumPy
数组并执行一些数学函数。time.time()
1
2
3
4
5
6
7
8
9
10
11
import times = time.time() x_cpu = np.ones((1000 , 100 , 1000 )) np_result = np.sqrt(np.sum (x_cpu**2 , axis=-1 )) e = time.time() np_time = e - s print ("Time consumed by NumPy: " , np_time)Time consumed by NumPy: 0.5474584102630615
同样,创建一个 3D CuPy 数组,执行数学运算,并为其计时以提高性能。
1 2 3 4 5 6 7 8 9 s = time.time() x_gpu = cp.ones((1000 , 100 , 1000 )) cp_result = cp.sqrt(cp.sum (x_gpu**2 , axis=-1 )) e = time.time() cp_time = e - s print ("\nTime consumed by CuPy: " , cp_time)Time consumed by CuPy: 0.001028299331665039
为了计算差异,我们将 NumPy 时间除以 CuPy 时间
1
2
3
4
diff = np_time/cp_time print (f'\nCuPy is {diff: .2 f} X time faster than NumPy' )CuPy is 532.39 X time faster than NumPy
在使用 CuPy 时,我们似乎获得了超过 500
倍的性能提升 。
02. 使用示例 CuPy 的基础知识
在本节中,我们将比较 CuPy 和 Numpy 的语法,它们有 95% 的相似度。
首先使用 Python 列表创建一个 NumPy 和 CuPy
数组,之后我们将计算向量的范数。
1
2
3
4
5
6
7
8
9
10
import cupy as cpimport numpy as npx = [3 , 4 , 5 ] x_np = np.array(x) x_cp = cp.array(x) l2_np = np.linalg.norm(x_np) l2_cp = cp.linalg.norm(x_cp) print ("Numpy: " , l2_np)print ("Cupy: " , l2_cp
正如我们所看到的,我们得到了类似的结果。
1
2
Numpy: 7.0710678118654755 Cupy: 7.0710678118654755
要将 NumPy 转换为 CuPy 数组,只需使用
.cp.asarray(X)
1
2
3
x_array = np.array([10 , 22 , 30 ]) x_cp_array = cp.asarray(x_array) type (x_cp_array)
cupy.ndarray
或者,使用 将 CuPy 转换为 Numpy 数组。.get()
1
2
x_np_array = x_cp_array.get() type (x_np_array)
numpy.ndarray
CuPy 高级应用示例
图像处理是 CuPy 的一个重要应用领域。以下是一个使用 CuPy
进行边缘检测的示例:
1
2
3
4
5
6
7
8
9
10
11
12
13
14
15
16
17
18
19
20
21
22
23
24
25
26
27
import cupy as cpimport cv2def edge_detection (image_path ): image = cv2.imread(image_path, cv2.IMREAD_GRAYSCALE) image_gpu = cp.asarray(image) sobel_x = cp.array([[-1 , 0 , 1 ], [-2 , 0 , 2 ], [-1 , 0 , 1 ]], dtype=cp.float32) sobel_y = cp.array([[-1 , -2 , -1 ], [0 , 0 , 0 ], [1 , 2 , 1 ]], dtype=cp.float32) edge_x = cp.abs (cp.signal.convolve2d(image_gpu, sobel_x, mode='same' )) edge_y = cp.abs (cp.signal.convolve2d(image_gpu, sobel_y, mode='same' )) edge = cp.sqrt(cp.square(edge_x) + cp.square(edge_y)) result = cp.asnumpy(edge) cv2.imshow('Edge Detection' , result) cv2.waitKey(0 ) cv2.destroyAllWindows() edge_detection('path_to_your_image.jpg' )
这个示例展示了如何使用 CuPy 在 GPU
上进行图像的边缘检测,这对于图像分析和计算机视觉应用非常有用。
CuPy 在处理大规模数据运算时表现出色。下面是一个矩阵乘法的示例:
1
2
3
4
5
6
7
8
9
10
11
12
import cupy as cpimport timea_gpu = cp.random.rand(10000 , 10000 ) b_gpu = cp.random.rand(10000 , 10000 ) start_time = time.time() c_gpu = cp.dot(a_gpu, b_gpu) cp.cuda.Stream.null.synchronize() print ("CuPy 矩阵乘法时间:" , time.time() - start_time)
这个示例展示了 CuPy
在执行大规模矩阵乘法时的高效性,这对于科学计算和数据分析尤其重要。
CuPy 也可以用于构建和训练简单的神经网络。以下是一个示例:
1
2
3
4
5
6
7
8
9
10
11
12
13
14
15
16
17
import cupy as cpdef sigmoid (x ): return 1 / (1 + cp.exp(-x)) weights = cp.random.rand(3 , 1 ) inputs = cp.array([[1 , 0 , 1 ], [1 , 1 , 1 ], [0 , 0 , 1 ]]) outputs = sigmoid(cp.dot(inputs, weights)) print (outputs)
这个示例展示了如何使用 CuPy 进行简单的神经网络前向传播计算。
以上示例展示了 CuPy
在不同领域的应用,包括图像处理、大规模数据运算和深度学习。
03. Numpy、Cupy 和
Pytorch CuPy 和 NumPy 之间的区别
别问我有什么区别,问就是几乎一样样。实在要知道到底有什么区别,参考Differences
between CuPy and NumPy
Cupy 与 Numpy 互转
1
2
3
4
5
6
7
8
import cupy as cpimport numpy as npnumpy_data = cp.asnumpy(cupy_data) cupy_data = cp.asarray(numpy_data)
Cupy 与 Pytorch 互转
1 2 3 4 5 6 7 8 9 10 11 12 13 14 from cupy.core.dlpack import toDlpackfrom cupy.core.dlpack import fromDlpackfrom torch.utils.dlpack import to_dlpackfrom torch.utils.dlpack import from_dlpackimport torchcupy_data = fromDlpack(to_dlpack(tensor_data)) tensor_data = from_dlpack(toDlpack(cupy_data)
Numpy 与 Pytorch 互转
1
2
3
4
5
6
7
8
import numpy as npimport torchnumpy_data = tensor_data.numpy() tensor_data = torch.from_numpy(numpy_data)
抱个拳 总个结 Beyond NumPy
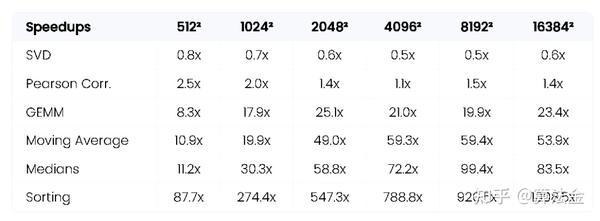
让我们以一张表结束:最快的 CPU VS 最快的 GPU。
CuPy 是一个强大的工具,它能够显著提高数据处理的速度。
对于那些希望在数据科学和机器学习领域进一步提升效率的朋友们,CuPy
绝对值得一试。
